
Over the years, we’ve seen firsthand how quality manufacturing impacts the products we use every day. Today, we want to shift gears from the factory floor to your home and talk about a fantastic flooring option: WPC click flooring. If you’re looking to upgrade your space with a durable, stylish, and DIY-friendly solution, you’re in the right place. This guide will walk you through the process of installing WPC click flooring, ensuring you achieve a professional-looking result.

What Exactly is WPC Click Flooring?
Before we dive into the “how-to,” let’s quickly understand what we’re working with. WPC stands for Wood Plastic Composite (or Wood Polymer Composite). This material forms the core of the planks, making them exceptionally durable and water-resistant – a huge plus for busy homes, kitchens, or basements!
Now, you might have also heard the term “WPC vinyl flooring.” It’s important to clarify that WPC click flooring is a specific type of WPC vinyl flooring. The “vinyl” part refers to the wear layer and the printed design layer that gives the floor its appearance (like wood or stone). The “WPC” refers to that robust, waterproof core. What makes WPC click flooring particularly popular among DIYers is its innovative “click-lock” or “floating floor” installation system. These planks have precisely engineered edges that snap together, eliminating the need for messy adhesives or specialized nailing. This is a key difference from some other vinyl or WPC products that might require glue-down installation. The rigid core of WPC click flooring also means it’s more forgiving over slightly uneven subfloors compared to flexible vinyl.
Read More: WPC Flooring vs. Solid Wood Flooring for Your Home
Gearing Up: Preparation for Installation
Proper preparation is the secret to any successful DIY project. Rushing this stage can lead to headaches down the line, so let’s get it right!
Required Tools and Materials
Having the right tools on hand will make the job much smoother:
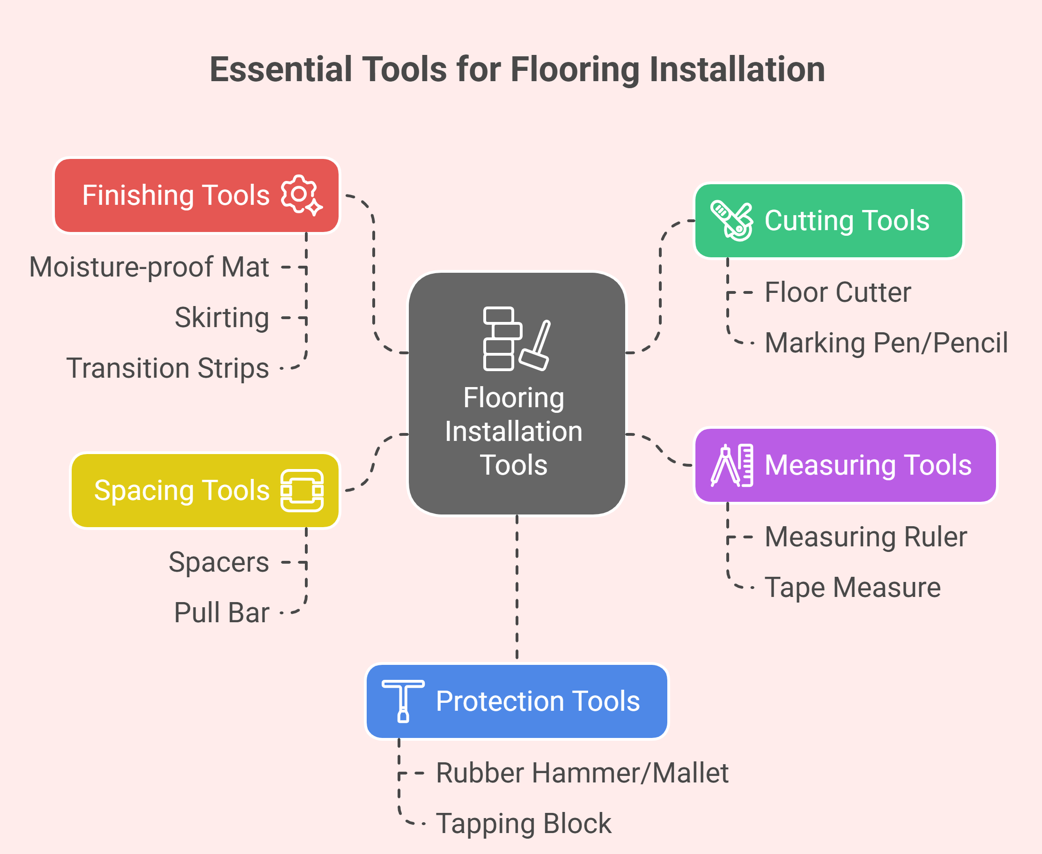
Installation Tool List:
- Rubber hammer/mallet:For gently tapping planks together if needed (often a soft-faced mallet is best).
- Marking pen or pencil:For marking your cuts.
- Floor cutter:A sharp utility knife with plenty of blades is often sufficient for WPC. For more extensive projects or thicker planks, a specialized vinyl floor cutter or even a fine-toothed saw (like a jigsaw or circular saw with an appropriate blade) can be used.
- Measuring ruler/tape measure:Essential for accurate measurements.
- Spacers:Typically 8-10mm (around 3/8 inch), to maintain expansion gaps.
- Tapping block (optional):If recommended by the flooring manufacturer, to protect the tongue when tapping.
- Pull bar (optional):Useful for pulling the last plank in a row into place.
Installation Auxiliary Materials:
- Moisture-proof mat (Underlayment):This is an important consideration.
- Skirting (Baseboards):To cover expansion gaps and provide a finished look.
- Transition strips:For doorways or when transitioning to different flooring types (e.g., T-molding, reducers, end caps).
Floor Preparation: The Foundation of Your New Floor
Your subfloor needs to be in good shape before you lay the first plank of your new WPC floor.
- Dry, Flat, and Clean:
- Dry:The subfloor must be completely dry. If you’re working with a concrete subfloor, conduct a moisture test. Excess moisture can lead to problems later.
- Flat (Level):This is crucial. Most WPC manufacturers specify a tolerance, often no more than a 3/16-inch (or about 5mm) deviation over a 10-foot (or 3-meter) span. Use a long straightedge or level to check.
- For low spots, use a suitable cementitious leveling compound.
- For high spots, you might need to sand them down (especially on wooden subfloors).
- Clean:Sweep and vacuum the subfloor thoroughly. Remove any debris, dust, grease, old adhesive, nails, or staples. A clean surface ensures the planks lay flat and the locking mechanism isn’t obstructed.
Question: Is Underlayment Required?
Many WPC click flooring products come with a pre-attached underlayment (often a thin foam or cork layer). This provides cushioning, sound dampening, and can act as a minor moisture barrier.
- If your WPC flooring has a pre-attached pad:You generally do not need an additional underlayment, unless specified by the manufacturer for particular subfloor conditions (e.g., over concrete for extra moisture protection). Adding another layer can sometimes make the floor feel too soft or compromise the locking system. Always check the manufacturer’s guidelines!
- If your WPC flooring does NOT have a pre-attached pad:You will likely need an underlayment. Choose one suitable for WPC click systems. It can help with sound absorption, thermal insulation, and provide a moisture barrier if needed (especially over concrete subfloors, where a 6-mil polyethylene vapor barrier is often recommended).
Adaptation Period: Let Your Floor Settle In
This is a step many people overlook, but it’s vital.
Leave the UNOPENED boxes of WPC flooring in the room where they will be installed for at least 48 hours. This allows the flooring to acclimate to the room’s normal temperature and humidity.
-Why?
Flooring materials expand and contract with changes in temperature and humidity. Acclimating them beforehand minimizes the risk of buckling, gapping, or warping after installation. Lay the boxes flat and avoid stacking them too high.
Step-by-Step: Installing Your WPC Click Flooring
With preparation complete, it’s time for the exciting part – laying your beautiful new floor!
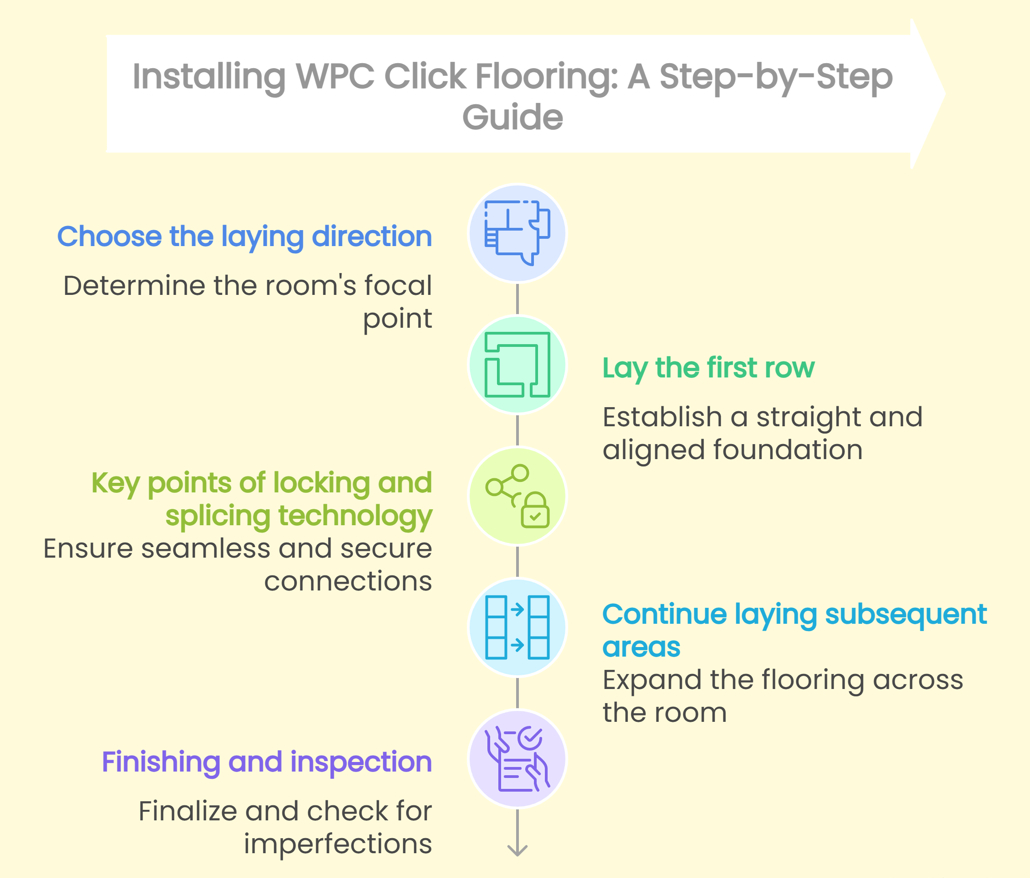
Step 1: Choose the Laying Direction
The direction you lay your planks can significantly impact the room’s visual appeal.
- How to determine the laying direction:
- Lighting:Often, planks are laid parallel to the main light source (e.g., running in the same direction as the light coming from the largest window). This can make the room feel brighter and more open.
- Room Shape/Direction:Laying planks parallel to the longest wall of the room can make the space feel larger and more elongated.
- Main Line of Sight:Consider the view as you enter the room. Planks running away from the entrance can draw the eye in.
- Starting Point:It’s generally recommended to start from the longest, straightest wall or a prominent corner of the room. This helps ensure your lines stay straight as you progress.
Step 2: Lay the First Row – Precision is Key!
The first row sets the stage for the entire floor.
- Retain the Expansion Joint (8-10mm or ~3/8 inch):This is non-negotiable! WPC flooring, like most floating floors, needs space to expand and contract with temperature and humidity changes.
- Place spacers between the wall and the edge of your first row of planks. You’ll do this on all sides of the room. This gap will be covered by skirting/baseboards later.
- Aligning and Cutting:
- For the very first plank, you might need to cut off the tongue edge if it’s facing the wall, ensuring a solid, flat edge against your spacers.
- Lay the first plank in the corner. Connect the second plank to the first, typically by angling the tongue of the second plank into the groove of the first and then lowering it. Ensure they are tightly locked.
- Continue this until you reach the end of the first row.
- Cutting the last panel in the row:Measure the distance from the last full plank to the wall, remembering to subtract the expansion gap. Mark this measurement on a new plank (measure from the correct end, considering the tongue/groove orientation!). Cut the plank using your utility knife (score and snap) or saw.
Step 3: Key Points of Locking and Splicing Technology
This is where the “click” in WPC click flooring comes into play. Most systems are either “angle-angle” or “angle-tap/drop.”
- Insert at the Correct Angle:
- For the short end (end-to-end connection), you’ll typically insert the tongue of the new plank into the groove of the installed plank at a slight angle (usually 15-30 degrees, check manufacturer instructions).
- Push it in gently and then lower the plank. It should click or lock into place. You should feel and often hear a click.
- Tap the Joint (If Necessary):
- Some systems may require a gentle tap with a rubber mallet and a tapping block along the long edge to ensure a tight fit, especially if it’s an “angle-tap” system. Never hit the plank directly with the hammer.
- Ensure the planks are perfectly aligned before tapping.
Tips: Avoid Common Mistakes:
- Not fully inserted:This will leave small gaps and compromise the joint’s integrity. Ensure there’s no lippage (one plank higher than the other).
- Forced knocking:This can damage the tongue or groove, making it difficult to get a good lock and potentially weakening the joint. If it doesn’t fit easily, check for debris in the groove or damage to the tongue.
- Misalignment:Ensure planks are perfectly parallel.
Step 4: Continue Laying Subsequent Areas
Once the first row is down and straight, the rest should flow more easily.
- Staggering Joints:This is crucial for both structural integrity and aesthetics. The end seams of planks in adjacent rows should be offset by at least 6-8 inches (15-20 cm), or as per manufacturer recommendations (some suggest 1/3 or 1/2 plank offset). Avoid “H” patterns where seams line up.
- You can often use the cut-off piece from the end of one row to start the next row, provided it’s longer than the minimum stagger distance. This also helps reduce waste.
- How to Bypass Door Frames and Corners:
- Door Frames:The neatest way is to undercut the door jambs and casing. Place a loose plank (with underlayment if used) next to the jamb, lay your handsaw flat on it, and cut through the jamb. The flooring will then slide neatly underneath.
- Corners/Irregular Shapes:Measure carefully and transfer these measurements to your plank. It can be helpful to make a cardboard template for tricky shapes. Cut with a jigsaw for curves or intricate cuts.
- Use Transition Strips:
- When your WPC flooring meets another type of flooring (e.g., tile, carpet), or at doorways, you’ll need transition strips.
- T-molding:For transitions between floors of similar height.
- Reducer:When transitioning to a lower floor.
- End Cap/Threshold:To finish the edge of the flooring, for example, at a sliding door.
- These are typically installed after the main flooring is laid.
Step 5: Finishing and Inspection – The Final Touches
You’re almost there!
- Check the Flatness and Lock Closure:Walk over the entire floor. Feel for any movement, lippage, or gaps between planks. If you find any issues, you might need to carefully undo a section and re-lay it.
- Install the Skirting (Baseboards):
- Once the floor is fully installed and you’re happy with it, remove the expansion spacers.
- Install your skirting/baseboards around the perimeter of the room. Nail the skirting to the wall, not into the WPC flooring. This allows the floor to “float” (expand and contract) freely underneath.
- Install Transition Strips:Securely fix your transition strips according to their specific instructions.
The Unseen Hero: Quality Extrusion and Your Floor
The quality of a WPC floor is significantly influenced by the precision of the WPC flooring extruding machine used to create its core.
This machine is responsible for mixing the wood dust and plastic components and then extruding them into the dense, stable core that gives WPC its renowned properties. A top-quality extruder ensures:
- Uniform Density and Consistency:This means every plank has the same structural integrity and performance characteristics.
- Precise Dimensions:Critical for the click-lock mechanisms to function perfectly. If the core isn’t precise, the locking system won’t be either, leading to installation difficulties and potential gaps.
- Enhanced Water Resistance:A well-extruded, dense core is less permeable to moisture.

At Boyu, we’ve dedicated decades to perfecting our extrusion technology. We understand that the reliability and precision of our machinery directly translate to the quality of the WPC flooring that manufacturers produce. So, when you choose a WPC click flooring product, remember that its ease of installation, durability, and overall performance are heavily reliant on the quality of its core, which begins with advanced extrusion. Investing in flooring made with care and precision technology means you’re getting a product designed for longevity and satisfaction.
Installing your own WPC click flooring is a rewarding project that can transform your home. Take your time, follow these steps, and enjoy your beautiful, durable new floor! We at Boyu are proud to play a part, albeit behind the scenes, in bringing such innovative and high-quality building materials to your home.